Beginning with Git using VSTS

February 9th, 2017 | Posted by Vidya Vrat in ALM / DevOps | VSTS - (0 Comments)

Introduction

Just like TFVC (Team Foundation Version Control), Git is another Source Version Control and it’s becoming very popular. VSTS (Visual Studio Team Services) supports both TFVC and Git. Let’s assume that you have no project or Repository and wants to begin with Git on VSTS.

Create a New Project

Login to your VSTS account and click on New Project

Fill the information

Click “Create” and you will notice that Project will be Created as shown below.

Clone it in IDE

Click “Clone in Visual Studio”. New Visual Studio IDE will start a dialog like shown below will popup.

Provide the Repository path and click on “Clone”.

Switch to Team explorer and Click on “Create a new project or solution”

When prompted choose the project type. After Project is added successfully you will notice that project is added in Solution Explorer and shows (+) in front of various items and also Team Explorer’s Changes tab shows all the items listed as newly being added.

Commit Changes and Publish

After project being added into Solution Explorer it’s considered as a change to the blank repository/project you created. Hence, this change needs to be added to remote Master branch.

In Team Explorer à Changes, add a comment for check-in and click on “Commit All”

Click “Commit All” and from the next Synchronization Tab, click “Publish”

Now your Git Repository in VSTS should be updated with the code you have pushed-in to it. Refresh your VSTS page and you should be able to see your project code added.

How to integrate slack with VSTS

October 10th, 2016 | Posted by Vidya Vrat in ALM / DevOps | VSTS - (0 Comments)

Abstract

All software development teams use some sort of team communication tool. Like many  team messaging tools  Slack is one of them. What I like most about slack is its ability to gel with VSTS (Visual Studio Team Services) and send notifications when an event is triggered for example, a Pull Request is created, or build succeeded or failed etc.

Note: VSTS was previously known as VSO. I.e. VSO is renamed to VSTS.

Introducing Slack

Slack is a widely used messaging application (web / desktop) it is widely used by many mission critical projects including Mars Curiosity Rover robots. In terms of software development, slack is very handy and efficient to notify when a VSTS event takes place. This feature reduces explicit team communication with peers that a pull requested is created and someone needs to look at that etc.

Let’s preview the final outcome

Objective is to  empower software development team(s) by enabling them to collaborate not only with peers but also with tools and services (VSTS in this case) and get immediate notification for any status updates instead of emailing or pinging someone in person for instance “Hi, Vidya Vrat. I have submitted a pull request.”

Now this article will show you Step-by-Step procedure to achieve “Slack integration with VSTS” and receive message as sown in the figure 0 below.

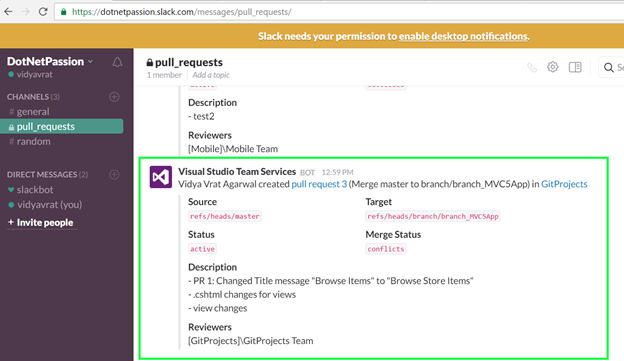
Figure 0 – Slack channel showing message received from VSTS

Create a Team on Slack

First step is to create a team (if not already) on https://slack.com click on “Create a new team” and enter a valid email-id which you have access to as shown in figure 1 below.

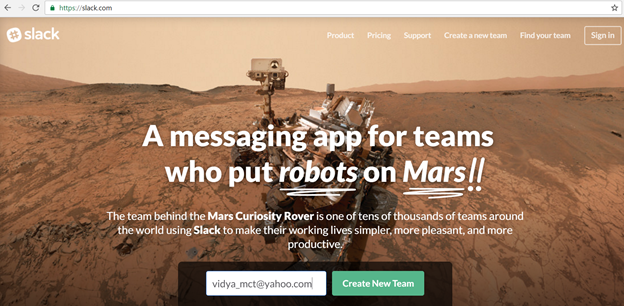
Figure 1- Slack.com main page to create a new team

When you click on “Create New Team” then you will be taken to a confirmation page as shown in figure 2 below.

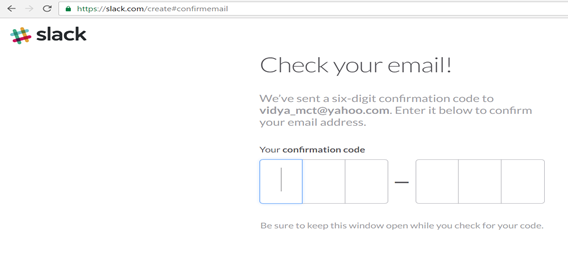
Figure 2 – Page to enter confirmation code

Check your email which you have entered while creating a team and you shall see an email with Slack confirmation code as shown in figure 3 below.

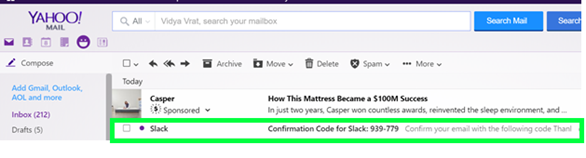
Figure 3- Slack Confirmation code email received

After successful validation of confirmation code as asked in Figure-2, next step will be to enter your name and username etc. as shown in Figure 4 below.

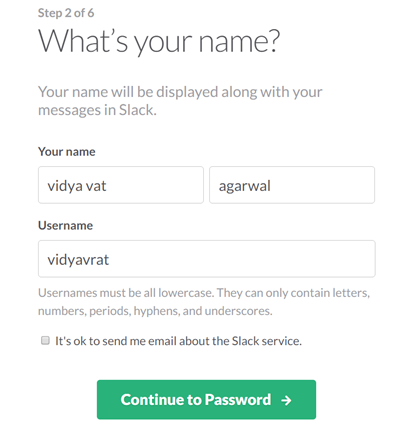
Figure 4- Personal details

Next step will be to enter team information as shown in figure 5 below.

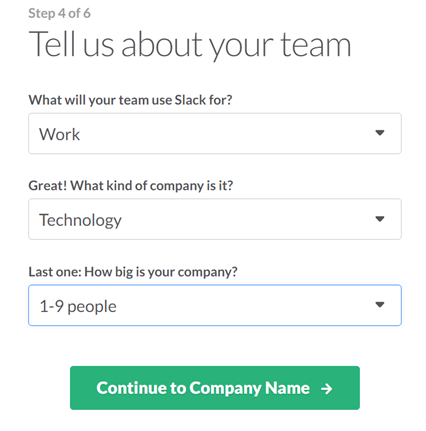
Figure 5 – Team information

Next Enter your company information as asked in figure 6 below.

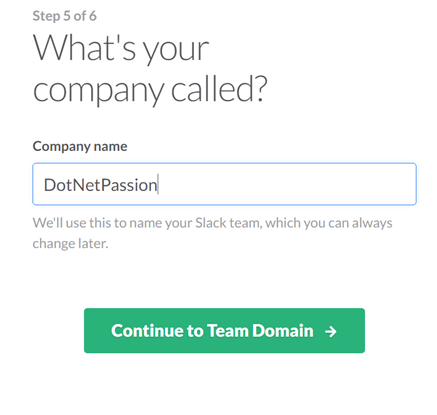
Figure 6 – Company name

Next step will be to enter your company domain as asked in figure 7 below. It is OK to enter a domain name which is not registered or you don’t have plans to register.

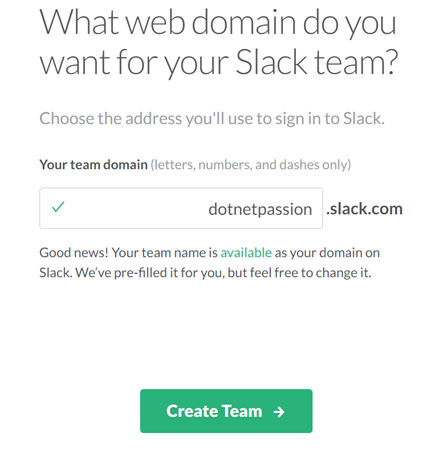
Figure 7 – Company web domain info

Figure 8 – Team invitation

If you don’t want to invite people now, then click Skip and you will be taken to slack team for DotNetPassion as shown in the figure 9 below.

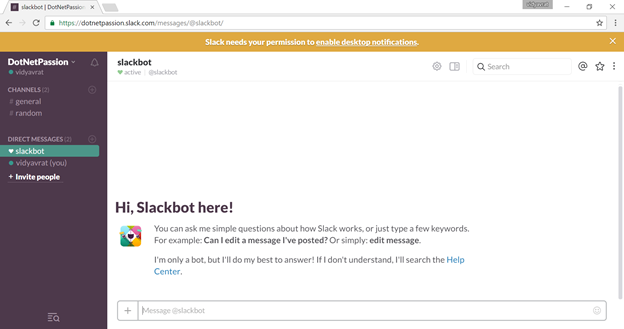
Figure 9 – DotNetPassion slack team page

Channel Creation on your Slack Team

Once your team is created, next step is to create a channel, which people will join and exchange messages.

Click on the + as shown in the figure 10 below.

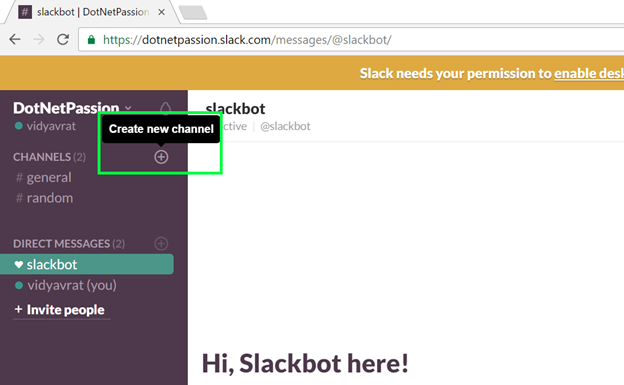
Figure 10 – Creating channel under team

Choose channel name and purpose etc. as shown in figure 11 below.

Figure 11 – Enter channel details

Click on “Create Channel” will create the channel named “pull_requests” under your team “DotNetPassion” as shown in the figure 12 below.

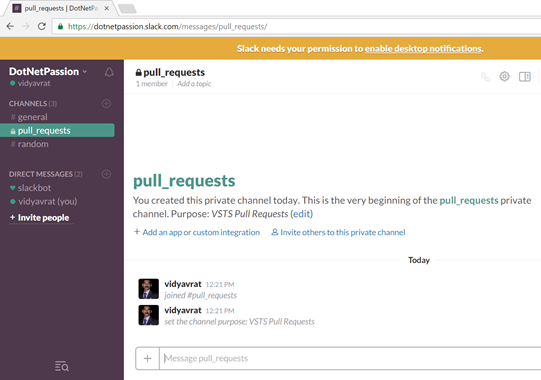
Figure 12 – Successful channel creation

Integration with VSTS

Click “Add an app or custom integration link on your slack channel page as shown in the figure 12 above. Then select Developer Tools, and then select VSTS as shown in figure 13 below.

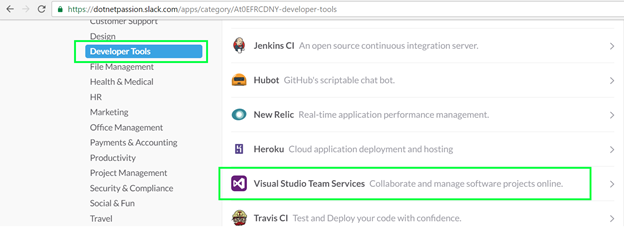
Figure 13 – Adding an app integration

Selecting Visual Studio Team Services will take you to next steps to Install as shown in figure 14 below.

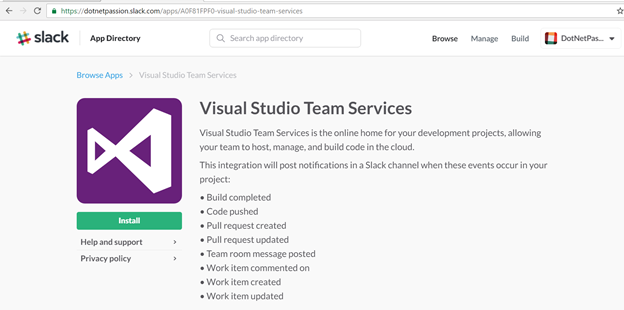
Figure 14 – VSTS Integration page

Click on Install to begin the integration procedure.

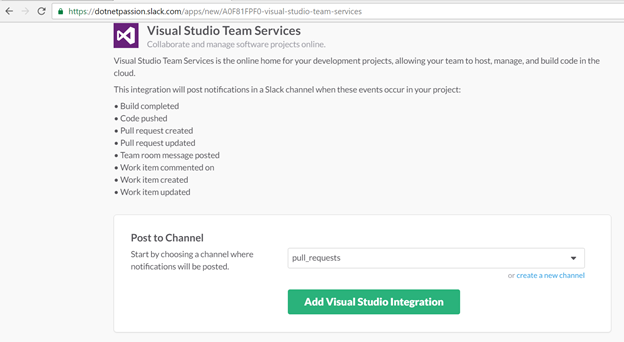
Figure 15 – Selecting channel name.

After clicking on “Add Visual Studio Integration” you will see step-by-step Instructions to configure your VSTS for clack integration as shown in figure 16 below.

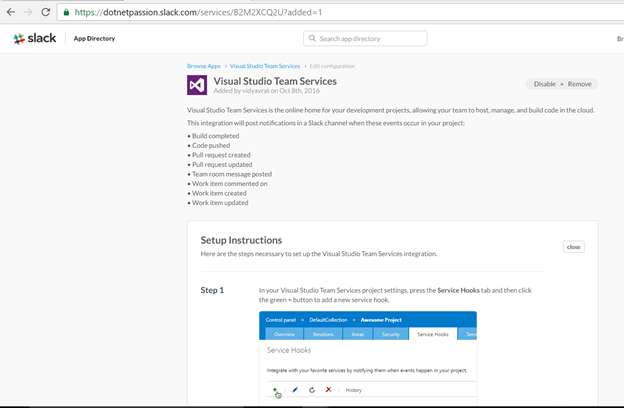
Figure 16 – VSTS setup instructions

Getting the Web Hook URL

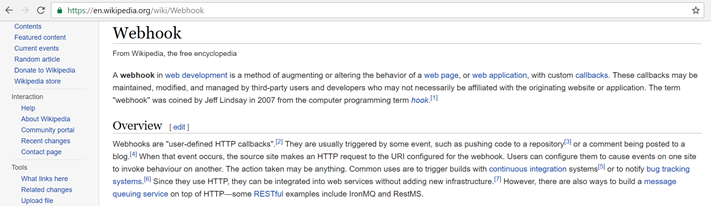
Figure 17 – Wikipedia Webhook definition

Scroll down on this page to see Integration Settings and get the “Webhook URL” as shown in Figure 18 below. This Webhook url is most important piece of information to complete VSTS and Slack integration. Either keep this page open or copy and paste in notepad etc.

Figure 18 – Webhook url

Now open a new Tab in your browser and login to your VSTS account and navigate to your code Repository as shown in figure 19 below.

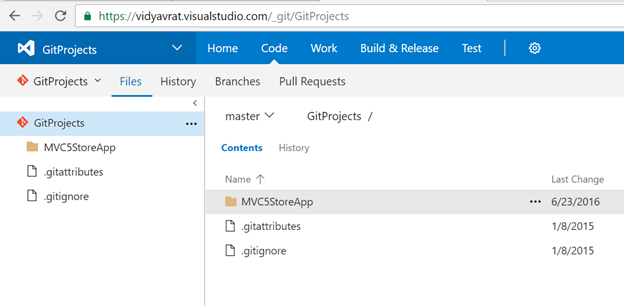
Figure 19 – Code repository in VSTS

Add VSTS Service Hook

From your VSTS code repository’s setting page, click on Service Hooks as shown in figure 20 below.

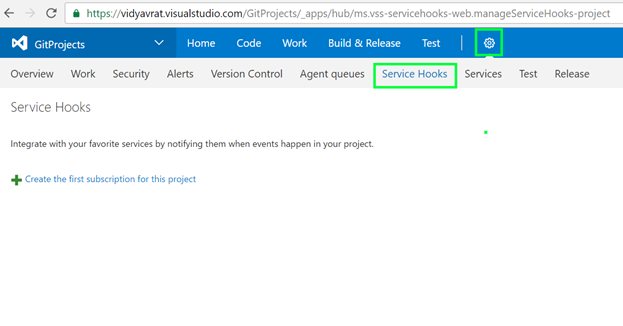
Figure 20 – Adding a VSTS Service Hook

Click on + to add a Service hook and choose Slack as shown in figure 21 below.

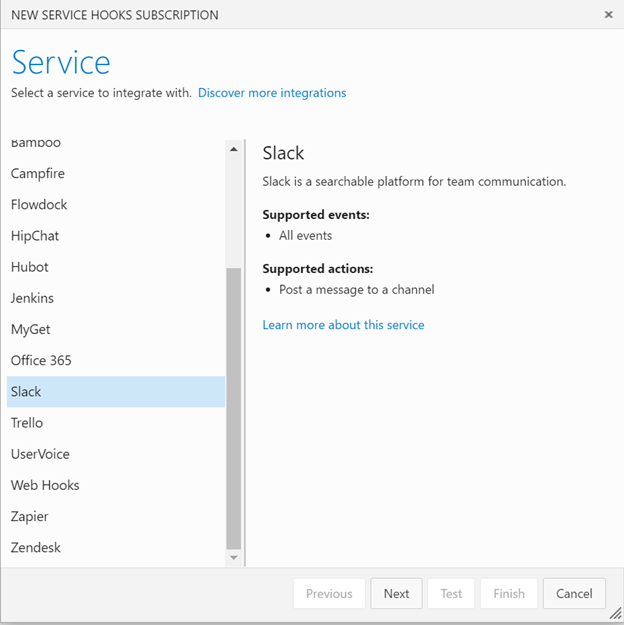
Figure 21 – Using Slack for Service Hook Subscription

Next you need to select the Trigger and repository settings etc. as shown in figure 22 below.

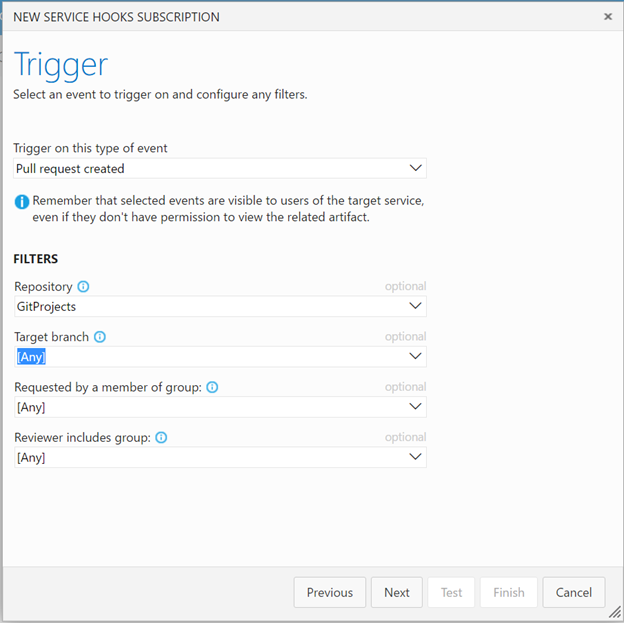
Figure 22 – Selecting Trigger settings

Next, confirm Action and webhook URL as shown in figure 23 below.

Figure 23 – Confirming Action with Webhook url

Next, click on “Test” to verify and test the VSTS integration as shown in figure 24 and 25 below.

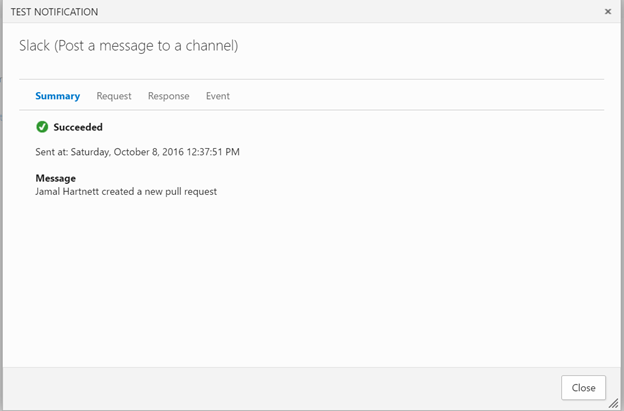
Figure 24– Test integration with VSTS

Figure 25 – Test message from VSTS delivered in slack channel

Now, switch back to the VSTS Integration page and click Finish as shown in figure 26 below.

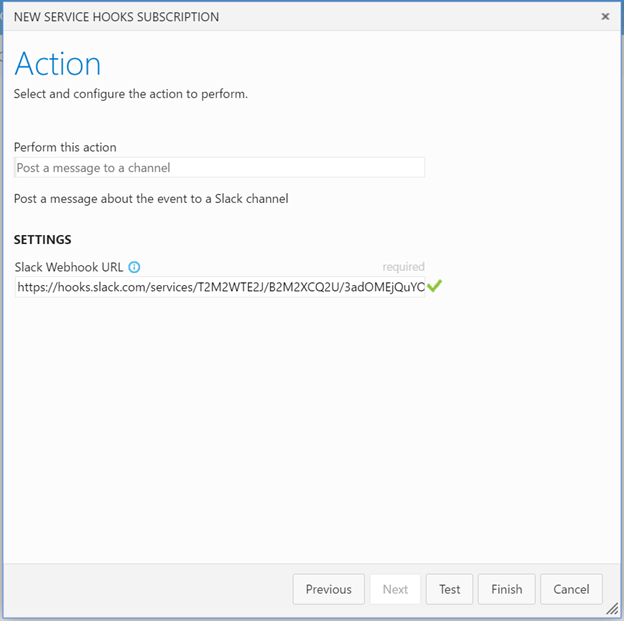
Figure 26 – Slack Integration Finish page

After Finish you will be taken to VSTS page and there you can see that service hook for slack is added as shown in figure 27 below.

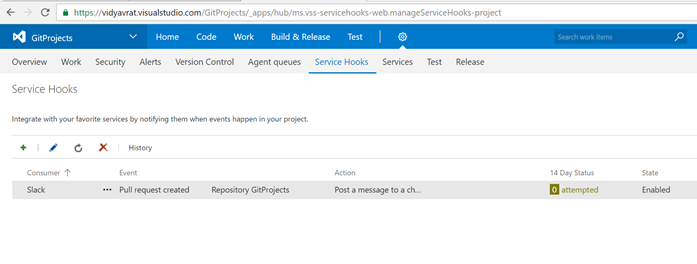
Figure 27 – Service hook for slack added in VSTS

Let’s Submit a Pull Request

In Visual Studio’s Team Explorer connect to a VSTS Git Repository as shown in figure 28 below.

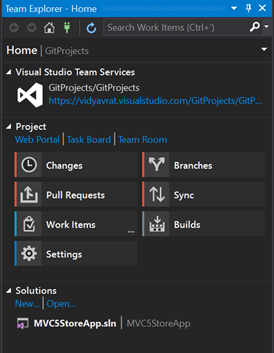
Figure 28 – Connecting with VSTS

Open the solution and make some changes as shown in figure 29 below.

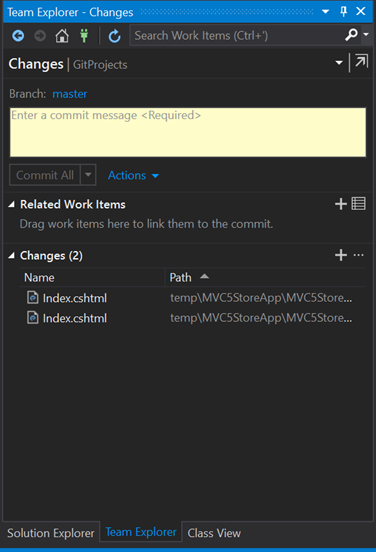
Figure 29 – File changes in Visual Studio

After you  Submit a new Pull Request, then slack will receive a notification as shown in the figure 30 below.

Figure 30 – Slack received VSTS Pull Request message

To navigate to Pull Request you can click on the pull request link in the message (pull request 3) and it will take you to the VSTS as shown in figure 31 below. If all looks good, then you can take next action steps(s).

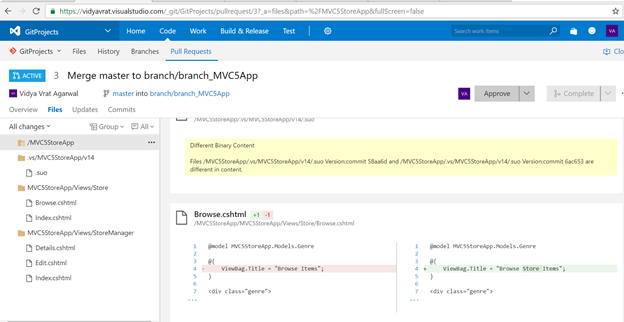
Figure 31 – Navigation to VSTS page from Slack message.


Introduction

Technical Debt is a term that is commonly used in agile-scrum team process. Technical debt is used for the work which team or an individual didn’t prioritize upon while pushing the deliverable, and  either left some unwanted code in various project artifacts, such as – .cs, .config, .cshtml, .js, .sql etc. or didn’t use the right technique to accomplish the goal. But in real world software development process this is expected and totally fine as long as team takes the responsibility to pay off the Technical Debt.

How is Technical Debt created?

Technical Debt is like financial $$ debt; if you don’t pay off previously owned $ amount but keep borrowing more than you are getting into messier situation. I assume you are not the one who like debt that much; whether it is technical or financial. Anyways, just to be aware; if you don’t take good care of the following items then you are potentially seeding “Technical Debt” situation in general, later on which needs to be paid off.

  • First and foremost poor coding style and standards.
  • No unit test cases.
  • Not following OO design principles.
  • Developing long monolithic classes and code libraries.
  • Not envisioning on proper candidate technology, architecture or approach and then hitting a wall. I.e. when application is little bit mature you start to feel the hit on User experience, performance, scalability, code maintenance etc.
  • Over engineered application. I.e. things which can be done in simpler way are done using very complicated mechanism. For instance, to do encryption data, custom code is written or taken from internet which causes a lot of security holes and performance hits.
  • Code files has a lot of comments. I.e. code is completely documented. Many developers write few lines of comment for each line of code.
  • Code is not self-documented. I.e. Classes, functions, variables etc. are given improper names. For example, a function is named Salary instead of EmployeeSalary or a variable is called double sal instead of double employeeSalary.
  • Shortcut approach is taken to push the functionality to meet the code complete deadlines. Such events trigger further refactoring to be performed later. For instance, created one thick bulky Model class with a lot of classes within. Or hard coded various paths and endpoints into the .cs code rather than putting those into a web.config and reading web.config Key in the code for the related value (key-value pair).
  • Dead code in project. You must have seen or left some commented code in various code files. This is dead code and needs to be cleaned up.

Based on above mentioned points, now you will be able to understand that why Technical Debt is also known as Code Debt or Design Debt. In addition, anything in your software development work; which slows you down or looks odd, or can be improved is a “Technical Debt”.

How to handle Technical Debt

First step is, not to cause any technical debt from your end; if at all possible. However, in agile development it’s common to have some technical debt accumulated over the period of time, if so then move to second step. Second step is to report any technical debt which you have either caused or came across.

Please don’t get into blame game or point finger to any individual. Let’s say you come across some code blocks in a file you are working on and then you see some dead code. Rather than start cleaning it up, I recommend create a Technical Debt item and let the team decide.

How to Report Technical Debt

Technical debt items are usually reported as Issues or as a “New Product Backlog Item”. Also, Technical debt items are supposed to be logged in a separate backlog. I.e. don’t report those to Production or sprint backlog. In many teams and as per my experience with agile-scrum I have always worked on a separate dedicated “TechnicalDebt backlog”

Having a separate TechnicalDebt Backlog allows the team to stay focused on Sprint backlog and don’t interfere with business requirements which are logged in the Product Backlog.

Creating Technical Debt backlog

Creation of backlog and modifying process templates etc. are usually done by an admin on your team project. In an agile team setting this duty is usually performed by the scrum master.

If your team doesn’t already have a Technical Debt backlog, then it’s time create one.

  1. Go to VSTS (Visual Studio Team Services) Team Project’s Web Portal and in control panel under work, click on Areas.
  2. Under the “Areas” click on “New child”
  3. Name it as “TechnicalDebt_<YourTeamProjectName>”. TechnicalDebt prefix helps you differentiate it with other areas and makes it self-explanatory.

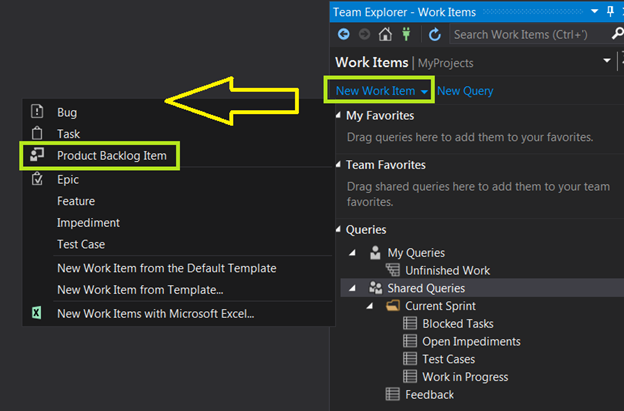
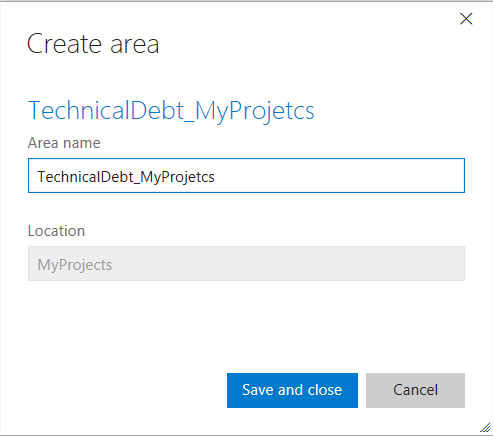
     4.It will now appear under your Team Project as an area.

Let’s see it from Developer’s angle

Developers usually interact via Team Explorer from within Visual Studio IDE.

Select Work Items and then click on “New Work Item” and based on your team process template; usually either Agile or Scrum, you can select Product Backlog Item or Impediment or Issue as item type to report the Technical debt.

Filling in the details

Usually, any item in any backlog needs to have ample information to describe what the issue is. In the below example, it is briefly pointed out that some classes need code cleanup. Some questions might still be unanswered and those will be discussed during backlog grooming and sprint planning.

When to work on Technical Debt

Just like Product and Sprint backlogs, Technical Debt backlog also needs to be groomed I.e. each “Technical Debt” item needs to be reviewed and groomed by the team to identify its validity, impact on overall team’s development experience and software quality team is producing. Once, team is in agreement to pay off a technical debt item or items then those items are transferred to Sprint Backlog and many times a new User Story is created for each technical debt.

Many Agile experts say that a team must not carry Technical Debt beyond a sprint, just like you should not carry Credit Card balances over to next pay period. I.e. pay off full Credit Card debt in the same billing cycle. But, it’s not always possible, so it doesn’t happen in software world for Technical Debt as well.

Summary

I personally recommend that as a developer you should not cause any technical debt due to the code you have written or currently writing. Be honest, about any improvements your code might need and explicitly call out what changes can be made to make it better. Avoid any over engineering or unwanted design patterns and technology implementations to be called out as Technical Debt. If you are not sure whether a particular code / technique is Technical Debt or not, call out a short brain storming session. In today’s software development industry it’s not easy to avoid technical debt, we all live with it, but be aware that you have to get rid of technical debt to achieve complete Technical Freedom.

VSO is now Rebranded as VSTS

May 19th, 2016 | Posted by Vidya Vrat in VSTS - (0 Comments)

Introduction to VSO

VSO (Visual Studio Online) a cloud based collaboration tool (can be considered as TFS online). VSO provides a set of tools that work with Visual Studio to effectively manage your application.

VSO Capabilities

VSO offers various capabilities which various team can utilize to build great software and really depend upon.

  •   Version control.
  •   Tools for Agile Software Development teams
  • Continuous Integration
  • Support for even Non-Microsoft Languages and Tools
  • Integration support for various 3rd Party Tools
  • Infrastructure Grade SLA

Note: All above images are taken from https://www.visualstudio.com/products/visual-studio-team-services-vs

Back in 2008

I do remember the earlier days when Microsoft 1st started this concept of VSTS (Visual Studio Team System).

You can click https://www.microsoft.com/en-us/download/details.aspx?id=16338 to visit the page as shown in image above

On-Premise VS Azure

Many work places have applications which they want to have access to anytime, anywhere and continue to build the applications using integrated, powerful, cross-platform, enterprise-level Agile tools ; so team(s) can share source code, build often, test early, and ship faster with less time to market.

Like many software companies “on premise” source control in form on TFS on their own servers has served the business need. Whereas for many cloud was the choice to set up a Team Services account,  connect their dev tools, share code, invite team members, and start working.

In these business scenarios TFS and VSO has been an answer respectively.

Rebranding made is meaningful

Recently, Microsoft re-visited the Branding idea of VSO and renamed/re-branded it back to VSTS. But now “S” is not System instead it’s “Services” as this is Azure based solution hence, Services make complete sense. I.e. VSTS (Visual Studio Team Services) which is Software-as-a-Service offered by Microsoft for organization’s ALM needs.

Note: This image is taken from https://www.visualstudio.com/products/what-is-visual-studio-online-vs?WT.srch=1&WT.mc_ID=SEM_MqzVAfsq

Summary

In my view VSTS provides better value to development team(s) and better ROI to management; as it enables and empowers the developers to collaborate anytime from anywhere. In addition it helps the organizations to reduce / cut-down the DevOps cost and needless to mention Zero investment into serves/disk spaces. Whether you are a dev using VSTS or on-Premise TFS you are not missing any features and capabilities from any of the flavor, VSTS is just a preferred/better way (in my view).