Visual Studio 2015 Feature Series #1 Account Management
Visual Studio 2015 Feature Series #2 Window Layouts
Abstract
An IDE’s Code Editor is every developer’s playground. Being a developer requires a lot of seeing, thinking and coding of course. This is the place where most of our time is spent in various activities. I learned that small things make big difference. This article will explain some of the code editor enhancements made in Visual Studio 2015 to improve developer’s productivity; which will help the developers to code better, to see better and even have better touch support if you are working on a touch enabled device.
Colored Tool Tips
Tool tip is a useful feature when a developer want to look at preview of a code segment; by placing mouse pointer over the collapsed construct such as class definitions, structure definitions, and method bodies. Visual Studio 2015 enhances the too tip view by showing colors as per the usage of code, keywords and types etc. If you hover mouse on a type and observe the preview generated then you will notice that code is hard to read and figure out the type, keywords and code etc. are in plain black color as shown below in Figure-1.
Figure-1: Plain Black Tool tip preview in Visual Studio 2013 This has served the purpose for many years but it doesn’t give proper visual clues on types, keywords and code used. Now let’s have a look at Visual Studio 2015 Tool tip as shown in Figure-2 below.

Figure-2: Colored Tool tip preview in Visual Studio 2015
Light Bulb and Quick Actions
Writing code is not easy and at times, some small productivity enhancement tips have big impact and give you some free time and take you away from thinking through of everything in terms of solving every error. What if Visual Studio code editor can itself suggest some actions; to resolve the issue? For instance, have a look at the Figure-3 shown below in which Visual Studio 2013 is showing an error when used ITest; which requires to explore some possible options to fix the issue on your own. 
Figure-3 Visual Studio 2013 Now, consider the same scenario in Visual Studio 2015, when you hover mouse on ITest then you will see a “Light Bulb” which will lead you to possible solutions, and this is really productive way of programming. Figure-4 Visual Studio 2015, Light Bulb
Removing Un-used Using
One of the best coding practice is to remove all un-used using statements from your code. The easiest way for a developer has always been to use the option “Organize Usings” because Visual Studio code editor was not telling you while coding; that which using is not being used. I.e. as shown in Figure-5 below shows that all using are being used until a developer try to invoke “Organize Usings”. 
Figure-5 using in Visual Studio 2013 Visual Studio 2015 made this using business very institutive and developer friendly, so as soon as you start adding using statements you will know immediately if that is being used or not and you can remove those very quickly with much fewer steps in comparison to prior Visual Studio code editors. 
Figure – 6 Greyed out using statements in Visual Studio 2015 Now, it’s also easy to remove un-used using statements. Just hover mouse on using statements and click on the “Light Bulb”. 
Figure – 7 Using Light Bulb to remove un-used using statements
Inline Rename
I have personally found that “Rename” is the most widely used Refactoring option as many times you want to rename something in your code either due to self-realization or to address a code reviewer comment. Before Visual Studio 2015, the “Rename Workflow” was quite tedious and lengthy workflow, let’s quickly have a look via Visual Studio 2013. Let’s say in the code below; we want to rename msg variable to message and preview the changes before it’s applied on the code. static void Main(string[] args) { string msg = “Hello from C# Console App”; Console.WriteLine(msg); } In Visual Studio 2013, you need to hover on msg, Right-click and select Refacor à Rename then a dialog will pop-up as shown in Figure-8 below. 
Figure-8 Visual Studio 2013 Refactor à Rename Now when you proceed by clicking on OK button, the workflow continues and you will see a screen as shown in Figure-9 below, highlighting all potential changes to be made if you choose to Apply rename on those. 
Figure-9 Visual Studio 2013 Preview Changes (Rename) After changes are applied across the code, the code will now appear as shown below classProgram { static void Main(string[] args) { // msg Renamed to message string message = “Hello from C# Console App”; Console.WriteLine(message); } } Now let’s review this Rename process through Visual Studio 2015, in Visual Studio 2015 Rename option is available right away in the context menu as shown in Figure 10 below. 
Rename from context menu Now when you click on the Rename it will highlight all the msg instances in code as shown in Figure-11 below. 
Figure – 11 Preview of rename in action
Now click on msg (First green selected instance) and start renaming it to message for instance as shown in Figure-12 below. 
Figure – 12 Inlined Rename in action
If you want to proceed with the code changes then click “Apply” on the dialog shown in code editor window and now code will be shown as below. classProgram { staticvoid Main(string[] args) { // msg Renamed to message string message = “Hello from C# Console App”; Console.WriteLine(message); } }
Touch Gestures
Touch Gestures is a powerful feature and can come handy occasionally; especially when you are either doing some R&D or reviewing a code or thinking of code enhancements using a touch-enabled device. If you are not coding and want to read through code and performs some basic operations then following touch gestures are supported by Visual Studio 2015 on a touch-enabled device.
Read Feature#1 Account Management in my previous article.
Abstract
Window Layout is a new Visual Studio 2015 feature related to developer’s productivity and ease of interaction with Visual Studio 2015 IDE. In previous version of Visual Studio developers were able to arrange windows as per their need but temporarily. Visual Studio 2015 extends this experience with some productivity enhancements.
Introduction
Window Layout is directly related to the way numerous windows are arranged and laid out in a Visual Studio IDE. IDE (Integrated Development Environment) is every developer’s tool for being creative, develop new things, being logical, fix issues, build and deploy various LOB (Line of Business) solutions etc.
Why Window Layout?
Different developer personality types like the windows to be arrange in specific way. Some like certain windows in the IDE and some like other windows. Some may like Pinned windows and some Tab styled.
Hence, Window Layout enables a developer’s to arrange the windows which they want and how they want and then save the layout for later use. Saved layout can be accessed from any machine on any device and applied to the IDE as long as that layout was saved to your Account Settings via Synchronization. Read Feature#1 Account Management in my previous article
So Window Layout enables you to arrange the IDE in a way you are most comfortable with and provides ease of use and productivity.
Which Windows are those?
Well, today Visual Studio 2015 stands mature and has a lot of windows which may appear in a developer’s screen wrapped into the IDE. For instance:
This list goes on and on, so let’s see the whole list via Visual Studio 2015 View menu.

Figure-1: Visual Studio 2015 View Menu
How to Save a Window Layout
Before you start saving a Window Layout, you to create one. Follow these steps:
1- Arrange windows (all which you work with mostly) in your desired way. For example as shown below: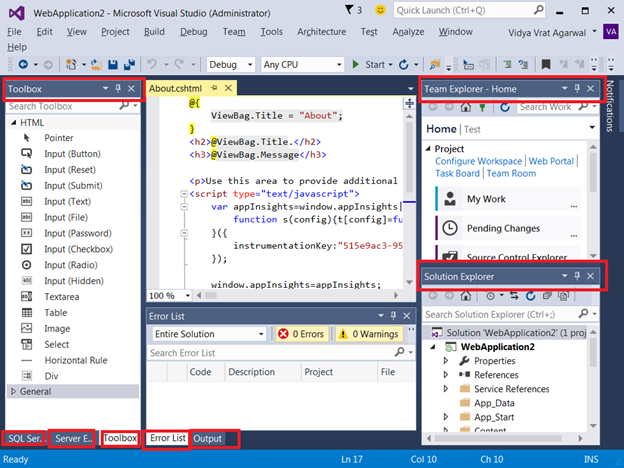
Figure-2: Arrange windows in Studio 2015
2- Now let’s save this Window Layout. Click on Window menu and choose “Save Window Layout”
Figure-3: Save Window Layout menus option
3- Name the Layout properly so you can recall from the name and click OK.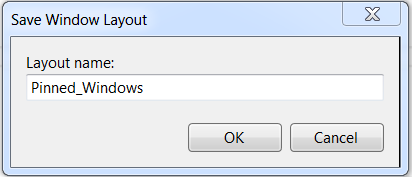
Figure-4: Naming a Layout
4- Now Layout is Saved and Synchronized with your Account Settings.
Reset Window Layout
Once you have saved the Layout and you want to test it, you have to reset the layout to default layout which Visual Studio IDE brings to you.
Go to Window menus and click on “Reset Window Layout”
Figure-5: Reset Window Layout menus option
Once you click on this option, Visual Studio will prompt you to confirm that you want to restore the default window layout. Click on Yes.
Figure-6: Confirmation dialog to Reset Window Layout
Now, Your IDE will be re-arranged to default layout as shown in the image below. Which could be the one you are having right now in your Visual Studio IDE.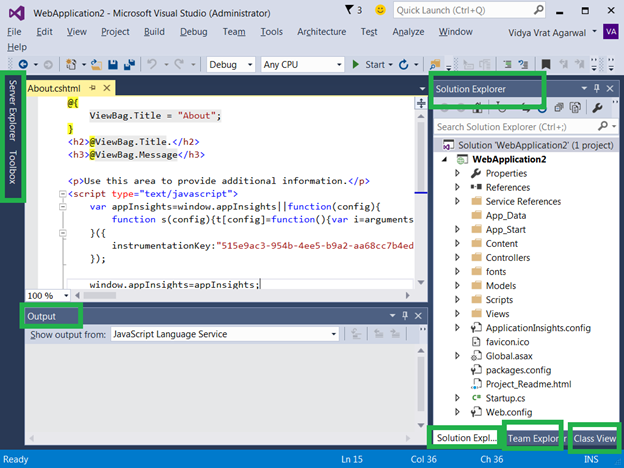
Figure-7: Default layout after Reset of the layout
Applying Saved Window Layout
To apply your saved Window Layout, go to Window menus and click on “Apply Window Layout” and choose one of the previously saved Window Layout. I have created and named my layout as “Pinned_Windows”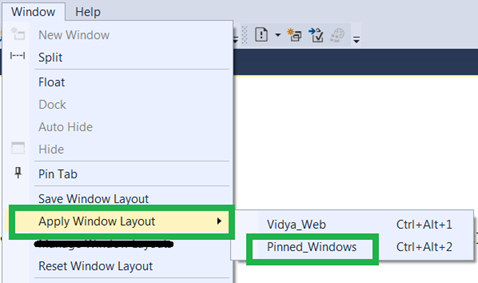
Figure-8: Apply Window Layout menu option
Click on “Pinned_Windows” layout and Visual Studio will show a confirmation dialog, click OK
Figure-9: Confirmation to Apply saved Window Layout
Now your layout will change to what you have saved and IDE will appear as shown below.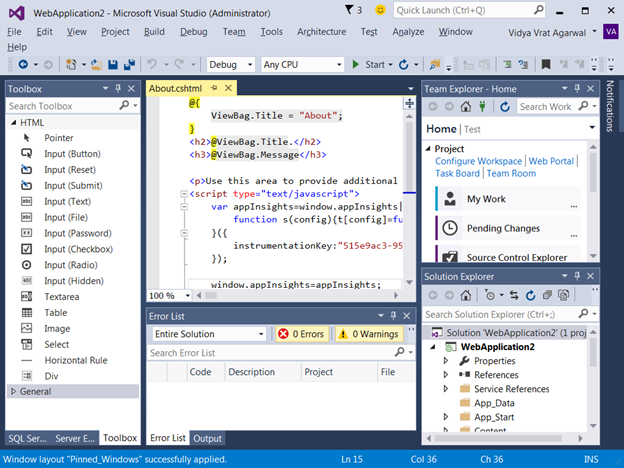
Figure-10: Saved layout applied
Manage Window Layout
As you can imagine you may end up with creating and cleaning up layout as per your needs. Hence, it become very important to manage the layouts which are created and available in your Account Settings.
You can easily manage the layouts via Window menu and “Manage Window Layout” option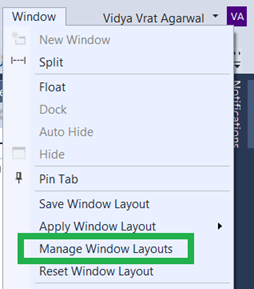
Figure-11: Manage Window Layouts menu option
Once you click on it, a dialog will open and allow you to Rename, Delete etc.
Figure-12: Manage Window Layouts dialog
Summary
Custom Window Layout in Visual Studio 2015 is a brand new way of arranging the windows in the IDE and saving the layout. After saving the layout, it’s also easy to manage and restore the window arrangements. This feature certainly helps the developers to feel comfortable with their window arrangements and continue to be productive across the devices using Visual Studio 2015.

Check |
Description |
√ |
Self-Describing Names |
Unit Test method names must be Self-Describing and Pascal case. For example choose Add_New_Customer_With_Valid_AcccountNumber over AddCustomer_with_validAcc or addCustomer etc.Also focus on naming style, keep the naming style consistent across all the tests methods and test. |
[ ] |
A3 (Arrange, Asset, Act) |
Make sure that all the Test Methods are designed around Arrange, Act and Assert.If required Refactor your code to fall into these three sections. |
[ ] |
Test Happy and Sad Path |
The unit test should cover all possible scenarios and strive for high code coverage and ensuring good quality metrics. Unit Test methods must exercise all possible use case scenarios to test the input validations, interactions, errors messages, edge cases and exceptions etc. |
[ ] |
Make use of Attributes |
Use Test Framework provided Attributes like :[TestCategory(“<describe if its Unit or Integration Test>”)][TestCategory(“<Which section of the application is being tested>”)][Priority(n), TestCategory(“<define if it’s Gated or not-Gated build Tests>”)][WorkItem(xxxx)][Owner(“<who wrote this test>”)] |
[ ] |
Have least number of asserts per test (if applicable) |
A good Unit test should only have limited # of assert statements. It should unit test the very functionality, as indicated in its descriptive name.A well-defined Unit Test should contain only one assert statement per test and must not try to exercise all the validation/boundary checks etc. by multiple Assert() in one Unit Test method. . |
[ ] |
Keep assert messages descriptive |
Use descriptive messages to improve readability of code and the build log.Assert.IsTrue(customer.IsExist,”The Customer is not found in the Database”); |
[ ] |
Unit != Integration |
There is a very fine line between Unit and Integration, if you happen to go beyond what your function is supposed to be doing then you are not writing a Unit Test. I.e. Unit Test doesn’t focus on interaction with external systems and software layers/dependencies.Test Doubles (for example Microsoft Fakes framework) comes into the picture to write unit tests which has dependencies on external libraries and systems etc. |
[ ] |
Follow OOP Design and Adopt DI |
Following Dependency Injection will allow to convert potential Integration Tests into small and quickly testable Unit Tests by taking advantages of Test Doubles (e.g. Microsoft Fakes, Moq, FakeItEasy frameworks etc.) |
[ ] |
Should be thorough |
Unit Tests are supposed to test all the possible areas of functionality that are subject to failure due to incorrect input/validation checks/boundary checks etc. for given function/method. |
[ ] |
Must be Repeatable |
Unit Tests must be repeatable for every build and must produce the same results. The development best practice suggests that if you are working on code that is impacting a Unit Test then you must fix the affected Unit Test as well and ensure that it passes. |
[ ] |
Have to be Independent |
Unit Tests must be independent of another test. In other words, no collateral damage. Hence, a Unit Test must focus only on a small aspect of big functionality. When this Unit Test fails, it should be easy to discover where the issue is in the code. I.e. can be tested in isolation |
[ ] |
Keep it Professional |
Even though at times Unit Tests may appear to be very simple and small, you must write Unit Tests with coding practices as good as you use for your main development coding. You may want to follow Refactoring, Code Analysis and Code Review practices and so on as for your Test Projects as well. |
[ ] |
No Collateral Damage |
Make Sure to Run all related Unit Tests after any dev code change big or small; to verify and ensure that no collateral damage occurs or has been introduced. |
[ ] |
If you break it, You bought it |
If you are working on a feature and to verify no collateral damage, as a best practice run all the Unit Tests. If you observe that some Unit Tests started failing because of your code changes then you own to Fix those broken Unit Tests to make sure that continue to pass. |
[ ] |
Track and maintain the tests |
The test code changes should be tracked and maintained as on-going effort. Continue to follow thedesign principles and coding guidelines. |
[ ] |
Code Review the Tests |
Just like any other Dev code, Unit Tests also needs to be code reviewed by peer. Regardless of size of the test; follow the process.Code review might include reviewing the name of test method, scenarios covered, conditions checked, scope of assertions and code / design smells etc. |
Abstract
Account Management is related to Sign-in feature; which was first time introduced with Visual Studio 2013. This feature has been helpful by various means, but Visual Studio 2015 even extends this experience with some enhancements.
Introduction
Account Management turned out to be very helpful feature, here are some points:
Synchronized Settings
Visual Studio 2013 and 2015 allows the users to choose which settings to synchronize. Let’s first understand which Visual Studio settings are candidate for Synchronization.
Visual Studio 2013 Synchronized Settings will be as shown in the image below.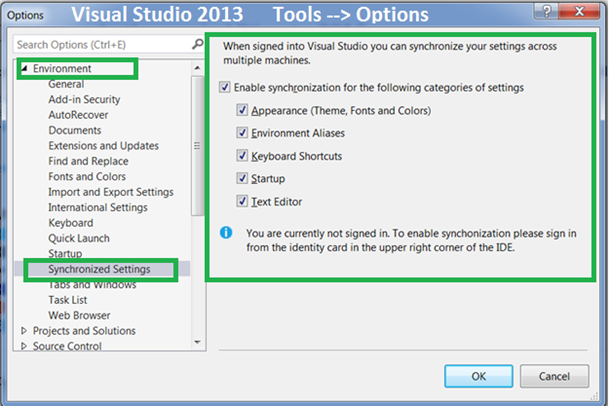
Visual Studio 2015 Synchronized Settings will be as shown in the image below.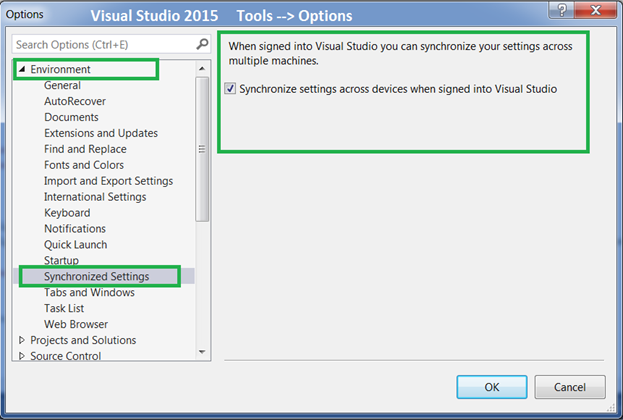
Account Management
In Visual Studio 2013 and 2015; Account Management comes into the picture as soon as you click on “Sign In” option on the Top-Right of your Visual Studio IDE as shown below.
Or Account Management settings can also be accessed via File –> Account Settings…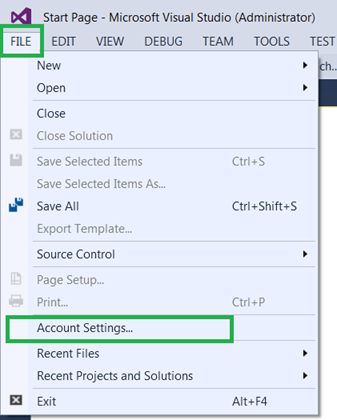
Improved Account Management with Visual Studio 2015
Microsoft has improvised Account Management experience for developers and made it better. The core change made in Visual Studio 2015 Account Management is the capability to store multiple accounts and have those listed and stored on that Account Setting page.
Immediate benefit for developers is the ability to log-in to Visual Studio with different associated accounts and work with different set of settings and projects.
Now question is what’s new in this; developers were able to this even with earlier version when it was introduced in Visual Studio 2013. Let’s see by diving deep into Account Settings.
Account Settings – Recap with Visual Studio 2013
When you Sign-in with Visual Studio 2013, your Account Settings page will open asking to Sign In.
After successful Sign-In Account Settings page will appear as follows.
The very obvious issue here is related to developer productivity and a developer who switches between accounts, need to punch-in all different set of credentials repeatedly.
Enhancement to Account Settings in Visual Studio 2015
Visual Studio 2015 comes with an enhanced Account Management feature to enable developers to store multiple Sign-In credentials under Account Settings. Ideally, it would be productive to have multiple accounts registered and then switch easily from one account to another without re-punching all the credentials repeatedly.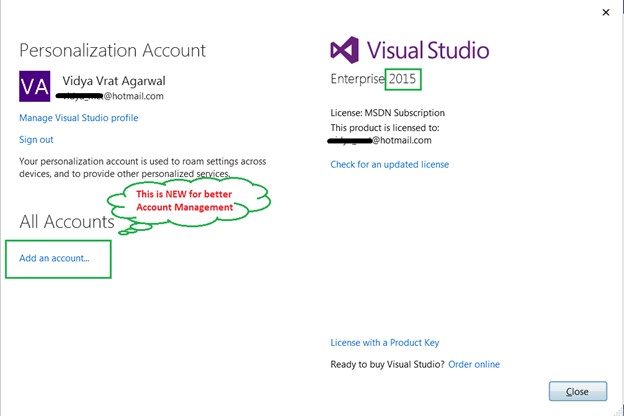
Adding New Account
Clicking on “Add an account…” will take you to Sign In dialog as shown below.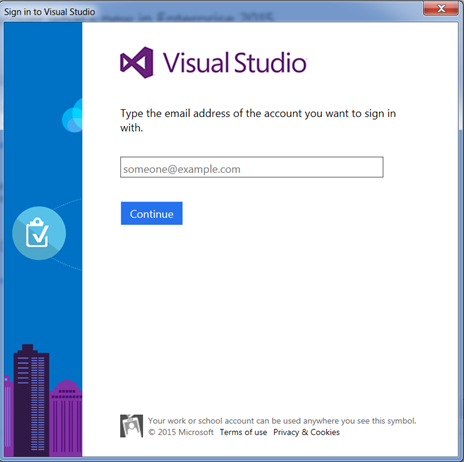
After Successful credential validation the Account Settings page will display the newly registered account under All Accounts.
This feature enables developers to have a centralized place to manage accounts and Synchronize settings across every registered Microsoft account.
Abstract
Many times this question comes to our mind that is one technology totally replaced by new release or new version of technology. In this article I will try to explain about such and similar issues and I will share my industry experience not only what I have seen in India (largest IT Solutions provider to the world) but also in USA.
I consider this to be a very hot topic and good candidate of debate rather; but I will try to share my thoughts on such a burning topic. In this article I am not going to highlight or defame any technology; I am just going to put my perspective as I have seen, experienced and advised to various clients and software teams.
Why new Versions
“Change is Only Constant” this principle applies very well to the Software Industry, and I respect this over-flow of information. Because this gives me a reason to “Keep Learning and stay ahead of the Curve”. By saying so I didn’t mean that someone has to learn anything and everything you can get your hands on. NO, certainly not, but before I explain this any further let’s take a step back and understand “Why new Versions” keep coming.
We are fortunate that we have seen a complete transition of the software industry from Desktop to Web to Mobile, upcoming generations may not witness this great and life-changing shift. Also, I recall my days when I was working and studying software in 1995, no one imagined that there will be MVC, WPF, WCF, so many versions of .NET and SQL Server etc. The industry was happy with MS-Access, Fox-Pro, C, C++, and Oracle etc. But our needs keep changing, they evolved and then the shell is broken to have huge expansion and today we have all kind of software technology and server products from client side to server side to mobile and hand-held and many more. We moved from on-premise to Cloud, Machine Learning is helping to dictate patterns and suggest needs.
This is why software companies keep building latest and newest technologies to enable and empower the world to build for future. When they release a version of a technology or language and they discover some issues or new features in that then they release newer versions and this in a chain reaction process and it will not stop.
Oh, then I will die Learning
As per Darwin’s Evolution Theory “Survival of the Fittest”,”fit” refers to “best adapted to the current environment.Here you simply replace environment to Software Industry. I am one of you and I don’t recommend that everyone has to learn everything but what I suggest it stick to your technology of choice and have good knowledge on their offered tools and technologies and various versions and when to use which one.
Also, you don’t necessarily have to know every single thing. For example, I only focus on .NET and related technologies, if anything falls beyond this area then I am not bothered. To be more precise, I don’t know Microsoft CRM, SharePoint, System Center, SQL Server Database Administration and few more things like that.
But this is not my weak point because “I continue to build my .NET Muscle” and keep learning about what helps me build Enterprise solutions using Microsoft.NET.
So choose your area of interest and where you have invested and then keep learning in the similar field and then you will no longer find it challenging; because if you observed new versions come after every few years and that has to be otherwise it will be No Fun!
Hmm, so Isn’t MVC Replacing ASP .NET Web Forms
Such decisions are not final and have no concrete answers. Yes, the industry changed their needs and so new technologies such as MVC and WPF takes over. This definitely doesn’t mean that ASP .NET Web Forms is replaced or it’s dead. If you know the Microsoft Web fundamentals MVC is based on ASP .NET and industry is trying to shift as and when they can from Web Forms to MVC and reap the benefits it offers.
Did you know that MVC is much older than ASP.NET? Yes, ASP .NET 1.0 was released in 2002 and MVC was created in 1979 originally named as “Thing-Model-View-Controller” but later simplified to be known as MVC.
In my view, I consider that there are now two technologies to build Web Solutions using Microsoft and based on your need you can pick one which works well for you. Usually, such technology selections are made by Architects assigned to the project.
So there is no such Golden Rule that every new or existing application has to be either created using MVC or migrated to MVC because MVC is latest and future of the web. Though it is.
Architectural Thinking – Brownfield Vs Greenfield Applications
All software applications you have worked or will work in future are either brownfield or greenfield.
Brownfield Development – When any existing or legacy applications needs to have new features or changes to address business needs; is known as the brownfield. In such situations, unless you are building new module or component you have less / limited or no scope to use new architecture styles, patterns etc. The very reason of such limitations is because those old applications are build using an old version of technologies and latest versions of one technology/framework may not be compatible with old versions.
Greenfield Development – When a brand new project is being envisioned and no previous work is done in that or related area then it’s called Greenfield. In software industry, it doesn’t happen very often. But whenever it happens its Architect’s responsibility to figure out what is the best technology to address business needs.
Hence, it’s not appropriate to say that because MVC is so new hence every new web application must be made using MVC or if WPF is available in addition to Windows Forms so every desktop application has to be made using WPF. Whatever is the case neither ASP .NET nor Win Forms can be totally ignored.
Why and Why not Latest Technologies should be picked
First, let’s discuss Why Not
Why develop using Latest Technologies
Why MVC over ASP .NET Web Forms then
Note- this section assumes that you are aware of MVC benefits and general technical terms used below.
Summary
Based on my experience as an architect in the industry I would like to summarize that it’s very hard for any organization to keep up with latest version and technologies all the time because by the time you become comfortable with one version the newer is around the corner.
So if you are working on MVC 4, then see if you can learn and try some application being developed on your own. Or if you just happen to be in ASP .NET Web Forms world until now then I would encourage you to try converting that application into MVC for your personal benefit.
This will enforce you to learn new technology and apply those learnings; if you made some progress in that then in next interview you can proudly showcase your MVC knowledge and say that you migrated ASP .NET WebForms to MVC.
“Regardless of what you are using to make a living out of a job, you have to learn new ones to build a Career.”
Abstract
Agile is a software development methodology which I becoming popular day by day. It defines the mind set of many software development teams working across the globe. This article will walk you through the entire agile-scrum process and how as a developer you can contribute in agile way and deliver value. BTW, agile means ability to move quickly.
Agenda
Life Cycle of a Developer
1st interaction a developer have is with BA, they are responsible to document, track and describe the user requirements. But many times there are gaps in understanding the needs; which causes issue by various means. Image below shows what user wanted and what happened when it is implemented.
Stop the blame game
In many team settings, a developer is considered to be responsible for everything, right from understanding requirements to code to support testing, help in deployment and then resolve production issues. Well, I always believed that entire software development is a team effort. But at the end, in most cases developers bear most of the blame. So its no longer a Developer’s responsibility to own everything rather team owns it.
Team Barriers = Value Delivery Impediments
All .NET Development teams want to deliver value but on realistic grounds what are barriers which stops a team to deliver value.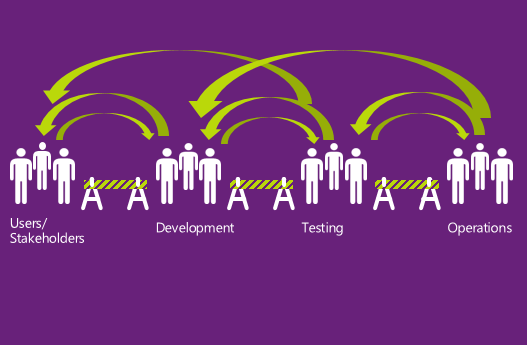
Every team has dependency within and on people outside, the communication gap and lack of understanding of common goal is the root cause of Value Delivery Impediments.
Impact of Team Barriers
Well, most of the issues any software teams runs into has following outcomes: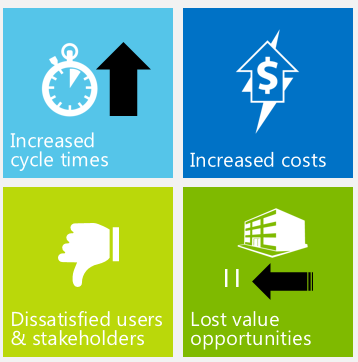
Increased Cycle Times – This means that you have to work longer to get work completed.
Increased costs – More time means more money.
Dissatisfied users & Stakeholders – End user missed the milestone of feature being available and so it raises concerns for stakeholders as well.
Lost value opportunities – You are potentially not going to have more work from same client.
Agile Adoption
Agile-Scrum is most widely accepted methodology of Agile development. Term scrum is taken from sport rugby in which whole team works get the possession of the ball.
Plan Driven Vs Value Driven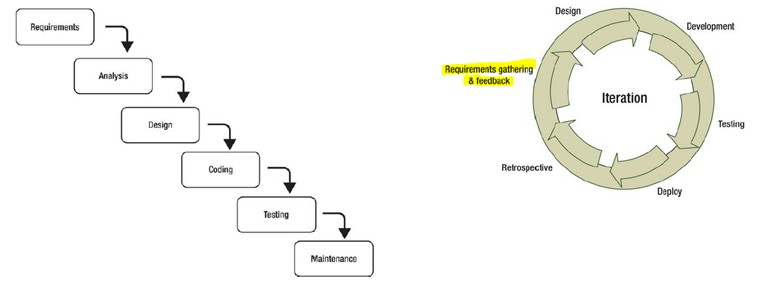
Plan Driven (waterfall approach) is an old school which defines software development life cycle. Many teams are still doing that though but in waterfall plan takes precedence over value.
Value Driven (agile approach) is new way of building software, it gels teams, stakeholders and user very well and help them team receive early feedback and fail fast.
Manifesto for Agile Development
17+ people gathered in a ski resort and they came up with agile manifesto.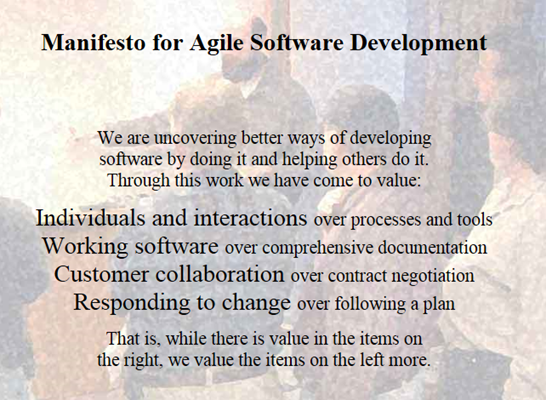
Understanding Type of Backlogs
In agile-scrum there are two type of backlogs
Product backlog is larger list of work items (in agile world known as User Stories), it is like a “Functional Specification Document” or System Requirement Specification Document or “Business Requirement Document” or whatever your organization likes to call it.
So whatever user requirements we have, all are stored in Product Backlog, backlog.
Sprint Backlog, Sprint is defined time, teams work on to deliver certain items from product backlog. But before teams start working on those items (User Stories), those need to be properly defined.
Scrum – End -to-End Process
Introduction
.NET Client Profile is supported by .NET Versions 3.5 and 4.0. It is designed for client applications like Console Applications, Windows Forms, WPF Applications and so on. As we all know there are many types of applications and hence what is required by one application may not be necessarily required by another type of application. For example, System.Web is only used by ASP.NET / Web apps, this is of no use for Windows Forms app. The Client Profile version of .NET Framework is a lightweight subset of the Framework. This enables quicker deployment and small installation packages.
Let’s see how Microsoft made the .NET Client Profile
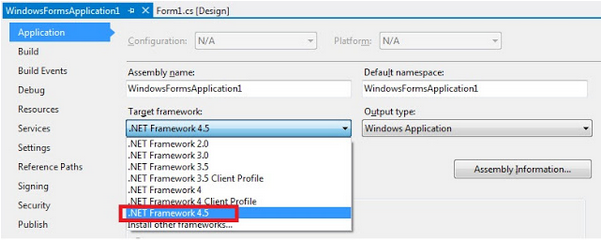
Microsoft removed some of the features from the .NET Framework to make the footprints smaller and optimized. Microsoft chose to remove ASP.NET, MSBuild, Advanced WCF features and support for Oracle databases to reduce the framework into a smaller and optimized footprint. Web Applications don’t support the Client Profile version of the framework. Web applications are server-side and so full .NET Framework installation is recommended, unlike client applications. Microsoft has removed the Client Profile from the latest version of .NET Framework 4.5 and hence with .NET 4.5 there is no Client Profile as shown in the image below.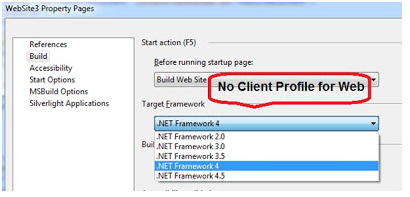
Why .NET 4.5 doesn’t have a Client Profile
Now if you think from a deployment’s point of view, you would want your installer to be as optimized and small as possible, so it takes the minimum required on the client machine and this can be done by the Client Profile flavor of.NET 3.5 and 4.0. .NET 4.5 is already optimized and tuned for quicker deployment and takes a small amount of disk space for all type of applications. Hence, no more .NET 4.5 Client Profile.
Abstract
In today’s software development world; we are solving complex business scenarios and developing large business applications. Hence, proper designing is the major factor which contributes to the scalability and performance of any .NET application.
Efficient Resource Management
Resources are very critical for the existence and survival of any application. Examples of resources include objects, files, connections, handles, streams etc. Hence proper handling and cleanup of such resources is critical for the better performance of system.
Here are points to consider:
Considerations for Crossings the Application Boundary
Applications live and run in their own territory which is defined by the Machine, Process or Application Domains they are hosted in or deployed on. I.e. if two applications communicate with each other across machine, process r app domain there is significant impact on performance of the application.
Single Large Assemblies or Multiple Smaller Assemblies
In .NET assembly is the unit of deployment; an application comes to an existence in the form of an assembly only. Any application you have built after compilation produces an assembly only. All the .dlls your project refers to are .NET Assemblies only.
When working on designing and architecting a solution it is critical to consider that different functionalities, classes and interfaces etc. should be part of one single chunky assembly or should be divided across multiple smaller assemblies.
Here are points to consider
Abstract
Before you begin coding, it very important to understand what type of output and behavior is expected. These questions can be answered by reviewing your Deployment and Test needs as well. In this article I will talk about guidelines for choosing right type of WCF project templates while creating WCF Service(s).
Introduction
Any application’s life begins with choosing a Project Template. Right type of Project Template has big impact on how your application will shape up, output type etc.
WCF Services Projects are no different than other applications except being biggest player in SOA world.
Different Templates for WCF
Most commonly used type in industry is either WCF Service Library or WCF Service Application, as shown in the image below.
The difference between two depends on your Test and Deployment needs.
Continue Reading Full Article…


 I am a hands-on architect with proven 19+ years of experience in architecting, designing, and developing distributed software solutions for large enterprises. At Microsoft, as a Principal Software Engineering Manager, I own the Platform team. I see software development as a craft, and I am a big proponent of software architecture and clean code discipline-n-practices. I like to see the bigger picture and make a broader impact. I was also a Microsoft MVP for past 7 years on Visual Studio and Dev Technologies I can be reached at vidya_mct@yahoo.com or twitter @dotnetauthor