Because a synchronous method call can create a delay in program flow which turns out to be bad user experience. Hence, an asynchronous approach will be better. Asynchronous method call will return immediately so that the program can perform other operations while the called method completes its work in certain situations.
The asynchronous methods behavior is different than synchronous ones. You call them; they start executing, but return the control back to the thread which called them in no time; while they continue to execute on different thread.
In general, asynchronous programming makes sense in two cases as:•
• If you are creating a UI intensive application in which user experience is prime concern. In this case, an asynchronous call allows the user interface to remain responsive. Unlike shown in Figure 1-1.
Implementing an MDI Form
The Multiple-Document Interface (MDI) is a specification that defines a user interface for applications that enable the user to work with more than one document at the same time under one parent form (window).
Visualize the working style of an application in which you are allowed to open multiple forms in one parent container window, and all the open forms will get listed under the Windows menu. Whereas having an individual window for each instance of the same application is termed as single document interface (SDI); applications such as Notepad, Microsoft Paint, Calculator, and so on, are SDI applications. SDI applications get opened only in their own windows and can become difficult to manage, unlike when you have multiple documents or forms open inside one MDI interface.
Hence, MDI applications follow a parent form and child form relationship model. MDI applications allow you to open, organize, and work with multiple documents at the same time by opening them under the context of the MDI parent form; therefore, once opened, they can’t be dragged out of it like an individual form.
The parent (MDI) form organizes and arranges all the child forms or documents that are currently open. You might have seen such options in many Windows applications under a Windows menu, such as Cascade, Tile Vertical, and so on.
Try It: Creating an MDI Parent Form with a Menu Bar
In this exercise, you will create an MDI form in the WinApp project. You will also see how to create a menu bar for the parent form, that will allow you to navigate to all the child forms. To do so, follow these steps:
WinApp objWA = new WinApp();
objWA.Show();
UserInfo objUI = new UserInfo();
objUI.Show();
Application.Exit();
Application.Run(new ParentForm());
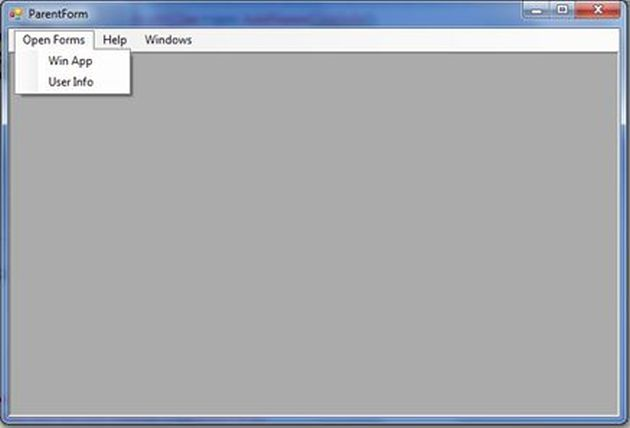
Figure 1-1. Running an MDI form application
This issue will be addressed later in this chapter.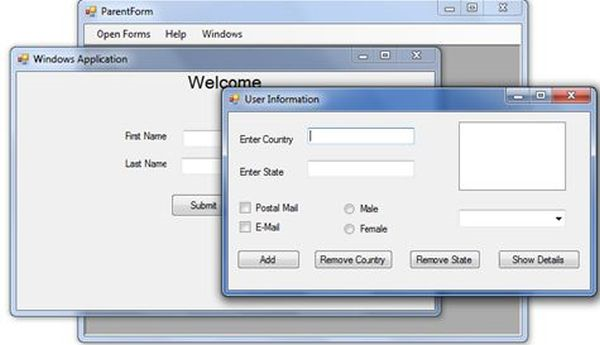
Figure 1-2. Running an MDI form application
How It Works
Each Windows Forms form is a class and exposes a Show() function by an instance created for it. You use the following code, that is creating an object and then invoking the Show() method. This opens the other form from the MDI parent form.
This creates an instance of the WinApp form and opens it for you:
WinApp objWA = new WinApp();
objWA.Show();
The following code creates an instance of the UserInfo form and opens it for you:
UserInfo objUI = new UserInfo();
Security is an essential part of an application and it should be taken into consideration from the grass root level from an application’s design. Security is all about protecting your assets from unauthorized actions.
But Code Access Security (CAS) is a feature of .NET CLR which enables you to control the permissions which an individual .NET application have on your system during its execution. As a developer, you must understand how to create applications that work even when some permission is restricted or to restrict your application to perform certain tasks for example, a user can’t delete/create a file in C:\Windows directory Read Full Article Here


 I am a hands-on architect with proven 19+ years of experience in architecting, designing, and developing distributed software solutions for large enterprises. At Microsoft, as a Principal Software Engineering Manager, I own the Platform team. I see software development as a craft, and I am a big proponent of software architecture and clean code discipline-n-practices. I like to see the bigger picture and make a broader impact. I was also a Microsoft MVP for past 7 years on Visual Studio and Dev Technologies I can be reached at vidya_mct@yahoo.com or twitter @dotnetauthor